|
||||||
|
|||||||||||||||||||||||||||||
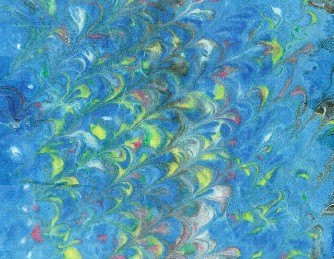
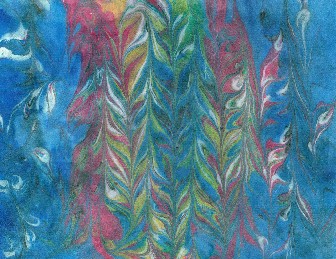
My Second Try at Marbling PaperBack to First Try page Several weeks passed as gardening season was in full swing. Finally, Memorial Day weekend came and I thought, I'll try that marbling again. Fortunately I had two pieces of paper I had already drenched in mordant from my first try, and I had ample sizing solution (methyl cellulose) available as well. The results being much more interesting, first I'll show them to you, then I'll tell you what I did differently that might help you with your marbling learning curve.
If you have Internet Explorer 7 (or higher, when this becomes ancient history) you can use the magnifying function to see greater detail in the images. First of all, I used a lot more ink than in my first try. I made straight lines of ink across my cookie pan (on top of the sizing). They did not disperse very much so after trying put one inside another I just laid them down close to each other in parallel. Secondly, I did not try to paint with the stick I used to make the pattern; I just did a simple grid (in the second image, which I did first, the grid was parallel to the sides of the paper. In the image on the left I did a diagonal grid). The only thing I did fancy was to put some of the ink down in wavy lines instead of in parallel lines. Most important, when you lift up the paper it doesn't look like there is a pattern on it; it looks muddy. Go ahead and wash all the mud off under gently running water as quickly as you can. The actual pattern has gone into the paper on contact. Fourth, this process takes a lot of paint. My kit came with 6 colors, 1/2 ounce each. Even though I had used minimal ink on my first attempts, by the time I did the 3rd page I was running out of some colors. Which leads to my fifth observation. Depending on what you want to do, it may not be necessary to clean the pan between sheets of paper. It is true that your pattern gets destroyed when the paper is dipped. Paint remains, and tends to be blurry. But for my 4th page (left image above) I left the mostly blue ink and made lines and then sputters with all the remaining ink from my kit. It actually ended up being an interesting piece. But don't skimp on paint. In addition to the kit I used, there is also a kit available at Dharma Trading Company that includes dispersant. It comes with only three colors of paint, but you can choose the colors and you get 4 oz of each, so you could do a lot more paper, silk or cotton. [My wife buys blank silk and cotton from Dharma for projects] Back to My First Try at Marbling Paper |