
|
||||||
The bright days of summer were shading into the doom and gloom of autumn in 2006 when I picked out a weekend and said to myself, "I'm going to put in that skylight Jan's been wanting." Or maybe I said to myself, "If it gets to be winter and there is no skylight I'll never hear the end of it." But I said nothing to Jan except, "Can you go to Santa Rosa on Saturday?" In our busy lives we can never be sure that something won't preempt a trip to buy construction material. Plus, we could go to Santa Rosa and shop for other stuff instead if I decided I would not have time to put in the skylight.
Our friend John Luna said it would take three days to put in a skylight. Considerably more if the salmon were running. I had been contemplating this skylight project for years, and of course I knew that almost everything takes longer than you think, especially if someone else is doing it and you are paying by the hour. We live in a barn-style house. It is our punishment for being hippies earlier in life. We are the second owners of the house, which was meant to be a garage with a guest apartment over it. But Haiku Jane and Don Reicholdt never got around to building the real house on the property. When Don could no longer manage the stairs they bought a house with an ocean view down off Iversen Road.
So the bottom floor, which our offices and bedroom occupy, still has a cement floor. The upstairs is pretty nice, with a wood floor and rough pine finishing. There are three regular windows, a small window for the bathroom, and a sliding glass door leading out to the deck. So it gets a fair amount of natural sunlight. But during the winter the sun is low in the sky (we're at about 39 degrees north latitude): at the solstice it is barely above the tree line. Those of you who live in Seattle, Chicago or Boston may laugh at what winter wimps we are, but Jan and I grew up further south and like our daylight.
The walls that form the two ends of the house are vertical, as are the walls downstairs, but the longer walls upstairs are actually part of the roof. There's a steep-pitched lower part that passes for a wall when you are inside, and then a milder-pitched peak overhead. The plan was to put the skylight in what I will call the wall, at about shoulder level, in the living room. The particular wall faces south.
I had already looked at skylights on previous trips to various home improvement stores. I had looked at the pages about windows in my Readers Digest Complete Home Improvement Manual. I had heard innumerable stories about leaking skylights, and a few about ones that did not leak. One person who put in a skylight that did not leak was Leslie Dahlhoff, the mayor of Point Arena. And the lessons from other people's experience was clear: get the flashing kit. I'll come back to that.
I had also looked at how the wall (or roof) had been constructed. Next to the kitchen area there is a nook that holds the refrigerator, water heater, and some food storage. The wall has no inside finishing, so you can see the interior construction. There are horizontal wooden beams I figured to be 2" x 6". They are at right angles to the roof-wall.
So I figured I would get a skylight and orient its long axis parallel to the ground and hence to the horizontal beams. Actually it was Jan who wanted it oriented parallel, but I was fine with that because of the beams going horizontally, unlike the vertical studs you would be dealing with putting a window into a normal wall. I figured I would have to take out one beam for the length of the skylight. I would cut holes of appropriate size in both the interior wall and exterior roof, which would include taking out some of the asphalt composition shingles. I would need to put in some 2x6s so the cut beam would not just be hanging loose, and if one beam could act as the lower frame then I would probably need another 2x6 to frame it at the top.
On Saturday I went to Home Depot in Windsor, just north of Santa Rosa, because I've had fairly consistent experiences shopping there. Jan came along because we had other shopping to do and also here approval of the skylight would be important. Better to argue about it in the store than to get home with something she does not approve of. We looked at the choices and to my surprise were able to agree on a Velux FS104 ($170.00), which does not open (Jan had wanted one that opens "for ventilation" even though the thing would be within a few feet of other sources of ventilation), which I figured meant simpler and less likely to leak. I also bought, for $57.00, the flashing kit that goes with it. Now the flashing kit has got to be pure profit for Velux, but unless you think your labor is worth nothing and you want to spend years cursing yourself as you watch water dampen the interior of your house, you just have to pony up. The flashing kit should, of course, be included with the skylight. It consists of a few dollars worth of tin, but its been shaped specifically for the skylight.
Being a two hour drive from Santa Rosa and knowing the limits of our local building supply joints, I bought fir lumber: two 2x4s, a 2x6, and a 2x2. I bought nails and caulking. And best of all, I bought myself a 10" compound miter saw made by Ryobi. Now, I'm only an occasional carpenter, but my dad taught me how to use a hand saw when I was a child and I'm pretty good with one. I already own a power circular saw and that can be quite handy. But I know a power miter saw can really speed up a project and as far as I'm concerned this saw paid for itself with this one project. On the other hand when using it I remind myself of friends who have lost fingers to such machines.
Going to Santa Rosa is an all-day affair for us. I did unload the pickup and spent quite a bit of time staring at the wall where the skylight would go. I opened up the instructions. I like to read the instructions through. I have had bad experiences on occasion with starting and number 1 and running into trouble further down the line. A couple of things were evident from the instructions. It would not be a good idea to orient the skylight parallel to the ground. It is designed to have a particular side up. I explained the need to put it in so it would not leak. Jan agreed not leaking was more important than a horizontal orientation.
Sunday morning I was up early and started by re-reading the instructions all the way through for both the skylight and the flashing kit. I also laid the skylight out with the flashing to make sure I understood how it would work. The slanted inner wall where I wanted the skylight consists of pine tongue-and-groove boards. Also there was a non-functioning housing for an electrical device in one spot. I figured one of the lower horizontal beams would correspond to the bottom of the skylight. I knew approximately where it was because the pine boards were nailed into it. So I cut a small exploratory rectangle around the electrical thing using my (Black and Decker) power circular saw. I made sure the wires to the socket were still dead, then removed the socket and tied the wires off real good with electrical tape.
Now I could see exactly where the cross beam lay. I ruled out a rectangle for the hole of the size recommended by the instructions. I lined up the right side (left would have been okay to) so that it corresponded with the edge of one of the pine wall boards. When I was satisfied that it was all reasonably square and the right size I cut along my penciled outline with the circular saw, being real careful not to overcut the corners (though if I had a little that would eventually get covered up).
This constituted commitment. It would never be forgotten if this skylight project did not work. I could see the lower horizontal beam plus two that cut across the whole. There was a bunch of insulation that needed to be cut away, which I did with scissors. I used duck tape to push the remaining insulation back from the hole so I could have some working room.
By the way, I always wear a dustmask and eye protection when working with power tools. My eyes and lungs are valuable to me.
Figuring where to mark the hole in the outer wall (actually, the roof) was tricky. I spent some time on it, trying to be sure the two holes would be aligned with each other. When I had my four corners marked I pounded nails through the corners.
Fortunately we have a deck outside that part of the roof, so I could work on the outside safely. This is the steeply-pitched part of the roof; if the deck were not there I would probably have chosen to put the skylight in the more horizontal section, just because it would be easier and safer.
Seeing where the hole would be, I was able to decide which asphalt shingles needed to come off. It isn't that hard to remove them, but you want to be careful because many that need to be removed then go back on (and still shed water). Each layer is covered by an overlapping layer. You lift up the covering layer and take out the roofing nail or staple that attaches the shingle. Once you have a couple out at the top it becomes easy to work your way down. Because shingles are put on with rows offset you have to take off an area much larger than where your hole is going to be.
Under the shingles is a tar-paper layer or equivalent. I knew I wanted to wrap the tar-paper up onto the sides of the skylight. I cut the paper in a rectangle several inches smaller than the skylight and saved that piece. Then I cut diagonal slices so the paper could be bent up away from where I would need to cut the wood sheeting. Tar paper breaks pretty easily, so you want to have extra handy or a plastic substitute. Finally I lined out my hole with a pencil, still using the nails as markers. The circular saw was hard to control because the roof slanted away from me, but I got reasonable cut lines that I knew would be covered over by the flashing.
The next problem were the two cross beams. A reciprocal power saw probably would have made this part easy, but I don't own one. I cut the lower beam with a hand saw. But the hand saw would not fit above the upper beam. I knew sawing upward through a 2x8 would be very difficult, so I decided to take a break.
I looked at my tools and pondered. It was a good excuse to by that reciprocating saw, but even if I bought it locally I'd be killing an hour. Finally a solution presented itself to my mind. I have several bow saws of various sizes that I use for trimming trees and cutting up kindling. I was able to reverse the direction of the blade, so that the tooths pointed in towards the bow. I did this around the beam, then I could cut downward with the aid of gravity. Pretty soon my hole was complete.
Framing the hole between the inner and outer walls took some patience. Despite my efforts things were not exactly square. Most of the wood pieces needed a bit of angle on at least one end. I worried some that I was using a 2x6 for the big pieces (because I had thought the beams were 2x6, when they were 2x8), but the frame would just be for structural strength. The well of the skylight would have to be finished with something like 1x10 board.
Having a framed and imperfect, but not too crooked hole, I readied the skylight for placement. After puzzling over the instructions a bit and comparing them to the skylight I realized I was supposed to bend the supports around to the proper position. That done they prevented the skylight from falling into the hole. Also certain pieces had to be removed so that they could be fitted back on over the tar paper or flashing. Only minutes before I realized I was ready to place the skylight and affix it with nails, Jan left on some errand. The one thing that it would have really helped having a second person to help with was getting the skylight positioned, the first nail in, and then perfectly square for the second nail. But I did it myself, somehow.
I think by then it was getting dark, and it was summer so I had been going a good twelve hours. I had hoped to finish in a single day, but after stopping for dinner I could not get motivated again, though I did read yet again the mysterious flashing instructions.
Day two, Monday. I carefully began assembling the tarpaper, the odd cladding that had been removed from the skylight, and the flashing. You start at the bottom, get that set, then start working the flashing up one side. The asphalt shingles need to be layered into the flashing, which did not seem clear from the instruction booklet but was not too hard in reality. However, this was time consuming. It was quite satisfying to get all the flashing and shingles in place and cap off the top end of the skylight. The day was over by the time I was done.
Tuesday I had other work to do too, but I went and bought a 1x10 board and some trim to make the lightwell look finished. Again the miter saw was very handy because the pieces were not exactly square. It is great how some trim can make a project that is a little rough look like you knew what you were doing and made no mistake. Jan helped by putting putty into various cracks where pieces of wood did not meet.
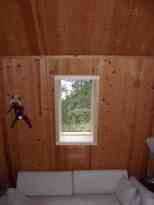
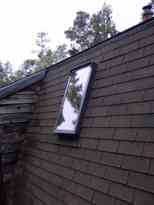
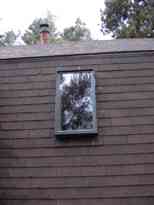
Here are some pictures of the finished skylight. Best of all, so far it has not leaked!
 |
 |
 |